
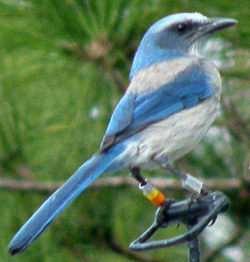
How to make RFID leg bands for birds
For more information contact Eli Bridge - ebridge@ou.edu.
This page describes a technique for manufacturing RFID leg bands for birds of virtually all sizes using inexpensive heat shrink material. DISCLAIMER: The bands described here have only recently been deployed in the field. Although the materials are very durable, there are no long-term data to verify that they will last for the lifetime of a bird.
The bands described here are made from semi-rigid PVC heat-shrink tubing (a product designed for insulating electrical wiring). The material shown on this website use can be ordered from Electro Insulation Corporation (www.electroinsulation.com) by calling 1-800-247-2114. Various sizes and colors are available. The specific item number will be something like "P.125CLSU", where the number is the inner diameter of the tubing before shrinking (1/8" in this example), and the letters that follow the number indicate the color ("CL" = "Clear" in this case). The photos below show clear material which is good for illustrating band construction.
MATERIALS & TOOLS
Semi-rigid PVC heat shrink tubing - You will probably need two sizes. One size fits the RFID transponder (PIT tag) the other should shrink down to the inner diameter of the tag size you wish to use. Consult Bird Banding Lab band size specs if necessary. The heat shrink tubing has a shrink ratio of 2:1, so get a size that is slightly less than 2x the diameter you want for your bands.
 Weld-on 4784 Vinyl adhesive - available in tubes at rplasitcs.com. One tube goes a long way.
12x2mm PIT tags - available from Intersoft Corporation or from Sven at www.cyntag.com.
Metal or wooden rods - You will need one or two rods with an outer diameter that correspondes to the desired inner diameter of your leg bands. The rods can be copper wire (lots of sizes are available a the hardware store), wooden dowel, or metal tubing. You can also add a layer of tape to slightly increase the diamter if needed. In addition you will need a second rod about 20% larger in diameter than the first (the exact diameter is not crucial).
A few hand tools - Wire cutters or scissors, heat gun, some very sharp razor blades, a flat working surface. A vice or some sort of clamp to hold the rods is optional.
Good ventilation - The glue releases some serious fumes.
 THE BASIC IDEA: What we want to do is seal several PIT tags in the 1/8" shrink tubing, glue the encapsulated tags onto a piece of tubing shrunk to the appropriate band size, split the band tubing, and apply an outer layer of tubing so the whole thing can be wrapped around a bird leg and glued in place.
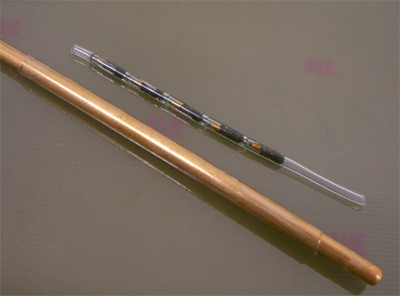
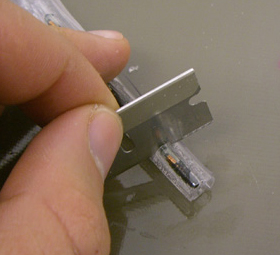
Step 1: Cut off a piece of 1/8" tubing about 6 inches long, and heat one end of the empty tube until you have about 1/4" of tubing at maximum shrinkage. Then place 5 PIT tags (or however many you think you can handle) into the tube, such that the fist tag slides down to the shrunk end of the tube and the others line up on top. Carefully apply the heat again rotating the tube to get even shrinkage of the piece of tubing. You should end up with 5 PIT tags tightly encased in heat shrink (see picture to above right).
Step 2: cut a piece of the band-sized material long enough to fit the string of PIT tags and shrink it down over the band-sized rod (see picture above).
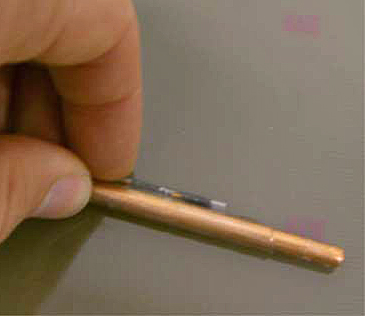
Step 3: Run a fine bead of glue along the band-sized piece of tubing and quickly press the string of PIT tags into it to form an initial bond. Roll the joined cylindars forward to press them both against the flat working surface such that the two pieces of tubing are parallel. Hold in this position for about a minute (this glue dries fast!).
| Step 4. Run an ample bead of glue along the joint between the two pieces of tubing. Let this dry for a minute or two and then do the other side of the joint. Give it a minute or two before moving on to step 5. |  |
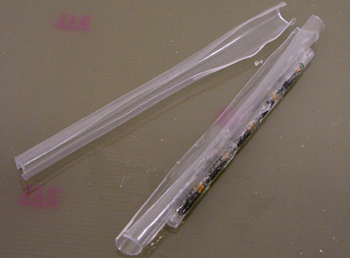
Step 5. Using a razor blade, split the band-sized tubing lengthwise on the side opposite the string of PIT tags. It can be difficult to cut a straight line, so go slow at first. Shrink a second piece of band-sized tubing over the smaller rod and split it lengthwise as well. You should have something resembling the picture to the right.
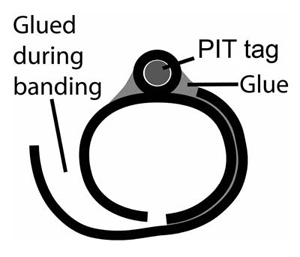
Step 6. Place the tube with the PIT tags glued on over the larger rod so that there is a gap along the split. Spread an ample amount of glue on one side of the split tube, between the cut and the PIT tags. Quickly wrap the other piece of split tubing around the first such that the split in the second (outer) piece of tubing rests against the string of PIT tags (see drawing below). Take care not to get any glue on the other side of the inner tube. Give this assemblage about 10 minutes or longer to dry. |
 |
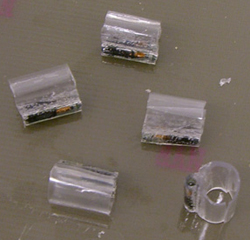
Step 7. Remove the band assemblage from the larger rod, and roll the band material up as tightly as you can. Then use a sharp razor blade to cut through all three pieces of tubing at the ends of each PIT tag. If you use a dull blade, you will likely ruin the bands or end up with rough edges on them. You should end up with something like the tags shown to the right.
DEPLOYING BANDSTo attach a band to a bird, simply wrap the band around the bird's tarsus making sure that the outer piece of tubing remains on the outside. Apply some glue to the free side of the inner band, and press the outer band against the inner such that the inner band is completely closed. Hold the band closed in this manner for about a minute, and you are done. The band should have enough tack to hold itself shut after one minute, but if possible, I recommend hanging onto the bird for at least three more minutes before letting it go.
|
 |
